


If you have a rusty piece of cast iron cookware that needs a fix, then don’t throw it out, bring it back to life! Learn how to restore a rusty cast iron skillet with a potato, some salt, and your self-cleaning oven!‘
It amazes me every year how many cast iron items are thrown away or sold at yard sales for just a couple bucks. Yes, maybe I can understand just trashing an old rusty cheap-o piece of no-name cast iron… but discarding a Griswold cast iron skillet because it looks rusted beyond repair just hurts my heart.
Cast iron cookware can last from generation to generation… and, in fact, that’s one of the major selling points of cast iron. I know because I live in East TN, and I’ve visited the Lodge Factory Store many times! “You can pass this on to your grandkids”, they say.
But at the first sign of rust, most people could care less about trying to restore their pans and instead just chuck ’em. Maybe it’s because they think that their rusty cast iron is beyond repair or because they just don’t want to invest the time to do it themselves. Admittedly, when I spent 3 hours grinding down a $3o Lodge pan with my Dremel a few years ago, I thought it would have been much easier to just buy a new one. They say hindsight is 20/20, and if I knew about this easy method for restoring cast iron pans back then, it would have saved me a lot of time and effort.
But back to this rusty Griswold…
When a friend gave me an old Griswold #8 cast iron skillet recently, I knew that no amount of rust could stop me from restoring that bad boy to its glory days… which happened to be in the 1930’s! And if I was going to sit on my front porch for 3 hours and nurse a Lodge skillet back to health, then you better believe that I was going to find a way to restore this rusty old Griswold.
And after just a few hours and a little elbow grease, I’m pretty proud of the results:

*Right side is BEFORE, Left side is AFTER… Not bad for a pan that’s almost 100 years old, eh?!
If you’ve got a treasured family heirloom or just a regular old cast iron piece that’s “eaten up” with rust like mine, then here’s how to restore a rusty cast iron skillet…
Supplies Needed to Restore Cast Iron Cookware
- 1 baking potato
- coarse salt
- rock salt
- stainless steel wool or other coarse scrubbing pad
- oil – I’ll tell you about my favorite oils to use on cast iron pans down below
- paper towels
To restore a rusty cast iron skillet, you’ll also need an oven, patience and some extra time… While this is an incredibly easy method to fix rusted cast iron, it does take some TIME! However, I have used this restoration method many times and I’ve always been happy with the results.
*Warning: If your cast iron is super old or thin, you may want to use a different method. The pictures in this post are from a 1930’s Griswold… so keep in mind, I was working with a 100 year old pan. Other cast iron restoration methods include a lye bath, electrolysis, and Carbon-Off, but like I said I have been very happy with this potato and salt method.
*One last side note…. Just because your cast iron has some rust DOSE NOT mean you have to do the oven step of this process. Putting your pan in the oven on self-cleaning mode completely strips your cast iron down to bare iron, and it takes some time to rebuild your seasoning. If you only have a little build up and spotty rust, then just try the potato and salt scrub first. All temps and times are what worked for me, but they may not necessarily work for you, based on the condition of your pan, the settings of your oven, etc.
The reason why I used the combination of the potato, salt, and self-cleaning oven methods is because my pan had deep-pitted rust AND carbon buildup.
How to Restore a Cast Iron Skillet
Step 1: Cut a raw baking potato in half.
What does restoring a cast iron skillet have to do with baking potatoes? Some people say there is a special rust-removing natural chemical in potatoes, and others say that it’s a bunch of jibberish and not to waste a good potato. I’m not a scientist and I don’t know anything about the chemical make-up of a potato, but what I DO KNOW is that this method has worked wonders for me. The potato adds just the right amount of moisture to make an effective paste, and the SALT is the star of the show here.
But as with anything, I encourage you to try out different methods to see what works best for you.
Step 2: Add about 1/2 cup of rock salt and 1/2 cup of coarse table salt to your rusty cast iron skillet.
*If you don’t have rock salt just use all coarse salt. It just breaks down faster than rock salt, so you might have to add more if needed.
Just pour the salt into the bottom of your rusty pan like this:
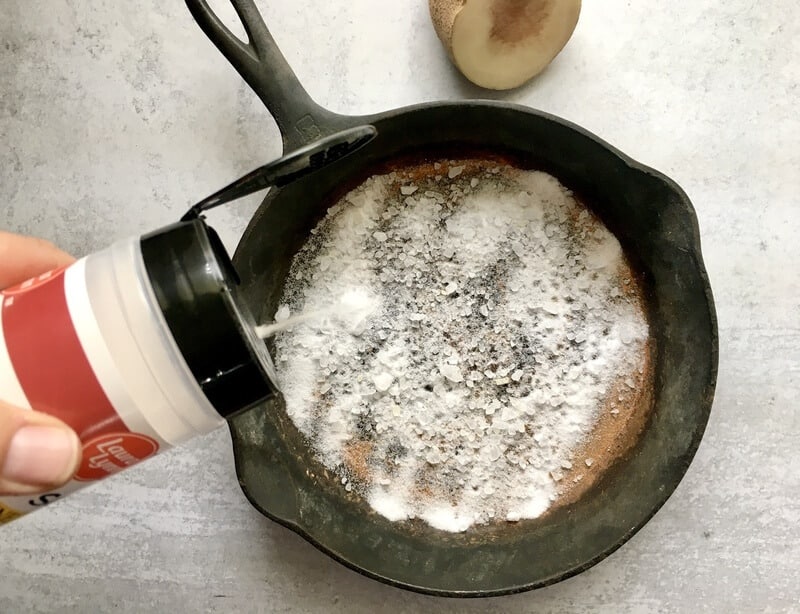
Step 3: Use the cut potato to scrub the salt all around the rusty cast iron skillet.
Yes, you’re going to use the potato as a scrubbing pad of sorts… Just take the potato, cut side down in the salted pan, and scrub like mad. The natural moisture will come out of the potato and be just enough so that you don’t have to add water. And when the moisture from the potato combines with the salt, you’ll have a really effective abrasion paste.
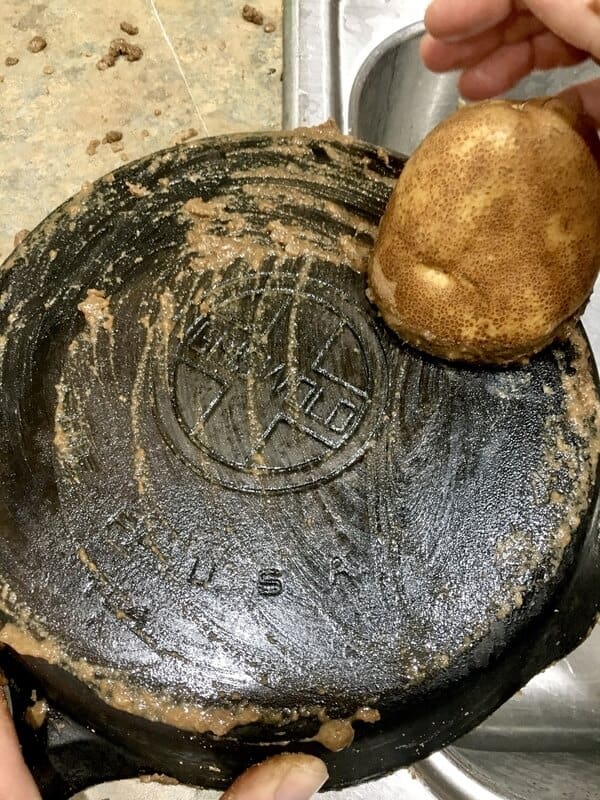
You should notice the rust coming off of your cast iron skillet immediately. When your “paste” starts turning a brown/rust color, then you know you’re on the right track. Keep scrubbing. If the outside and underneath of your cast iron pan is rusted too, then treat it just like the inside. The idea is to get all the rust off in this stage.
Your potato will probably look something like this:

Gross, I know… but this method for getting rust off a cast iron pan is VERY effective!
Step 4: Rinse your pan with warm water and repeat the salt scrubbing as needed.
Now you have two options depending on the severity of the rust. Either rinse your pan out and start the process again (if your rusty cast iron pan was SUPER bad!), or you can just rinse the pan and move on to the next step if you feel like the first salt rubbing was enough. The main purpose of rinsing your pan now is to be able to see more clearly if you removed all the rust. You will need to get all of the brown sludge out to see if you need to repeat the salt scrubbing process.
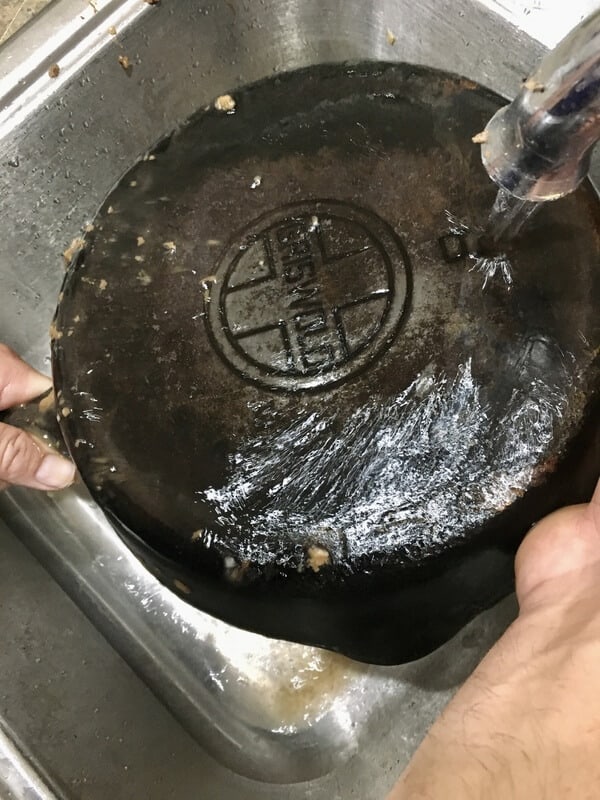
As you can see, my Griswold #8 cast iron skillet was VERY rusty, so I had to do the salt scrubbing process twice. I just rinsed my pan under warm water, dried it with a towel, and then dumped the salt in it again.
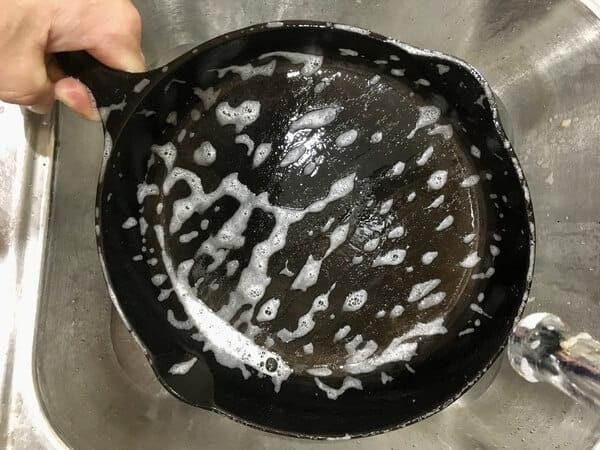
Step 5: Wash your refurbished cast iron skillet with warm soapy water.
Once you think you have all the rust off, go ahead and wash your cast iron skillet with good ole soapy water. Yep…regardless of what you’ve heard before about NEVER using soap on cast iron, DO NOT BELIEVE IT. Heck, even the instructions on a new Lodge say use soap if needed…
Once again, the debate over whether or not to use soap on cast iron is another story entirely, so I’ll save that for another post… coming soon!
*Note – If your pan only had a small amount of rust to start with, then this would be a good place to stop. You probably won’t need to put it in the oven.
Step 6: Place your restored cast iron skillet upside down in your oven, and set the oven to “Clean”.
If you have two oven racks, then it’s best to adjust one rack to the middle and one right underneath it. Then, place your cast iron skillet on the middle rack, with it turned upside down, and place either a sheet pan or a large sheet of aluminum foil on the second rack, directly underneath your pan, like this:
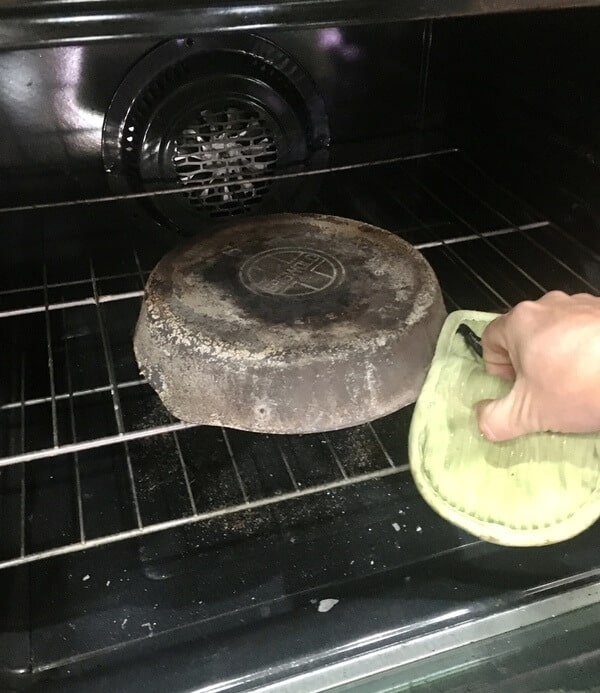
If you only have one oven rack, don’t panic! You can still use this method for how to restore a rusty cast iron skillet. Just put your rack in the middle of your oven, and set your pan directly on top of a piece of aluminum foil or a sheet pan.
Then turn your oven on “Clean” mode and let it do the work for you! Here are some questions you may have about this process:
How long should I leave my cast iron skillet to bake in the oven on “Clean” mode?
My oven (a Frigidaire Gallery electric glass top) has two options: a 2 hour clean and a 3 hour clean. I used the 2 hour self-cleaning mode and it worked perfectly!
What if my oven doesn’t have a self-cleaning mode? Can I still use it to restore my rusty cast iron pan?
No. The self-cleaning mode on a standard oven reaches an average of 850 degrees or higher which burns the carbon and seasoning off of your damaged pan and strips it down to bare metal. If you don’t have a self-cleaning oven, you should try a different restoration method.
Step 7: Let your pan cool, and then brush off any residue.
After your pan has gone through a full 2 hour cycle in the oven, let it cool before trying to move on to the next step. Then, you’re just going to use a stainless steel wool to knock all that crud off your pan.
You may be cussing me at this point, because it probably looks like your pan is damaged, but it’s not! This is how your pan should look after coming out of the oven. The black part is the oil over time turning black (or the patina), and the new silver color you see is actually the original color of iron before the company’s season process.
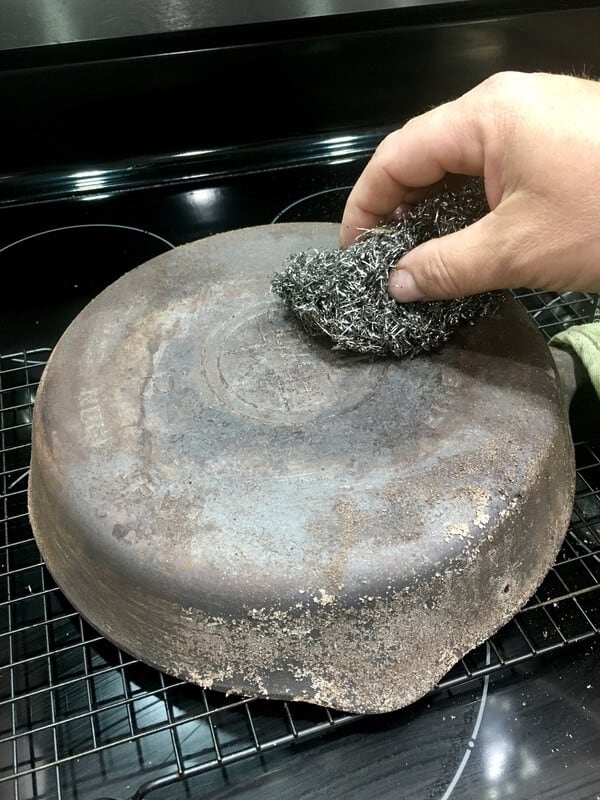
Just use your steel wool to brush off the “rust dust” and move on to the next step.
Step 8: Wash and dry your newly restored cast iron skillet!
Don’t worry, the finish line is near! Your pan should be looking good as new now… minus a few good coats of seasoning, which is coming up next. But first, after you’ve brushed off all the dried rust dust, give your pan a good thorough wash and dry.
How to Season a Restored Cast Iron Skillet
Now that you know how to restore a rusty cast iron skillet, it’s time for the seasoning process… and it’s important to remember that this takes some patience, too! After all, you’re doing a completely NEW seasoning on a BARE pan.
Here’s how I seasoned my restored skillet:
- Preheat oven to 500 degrees.
- Be sure that your cast iron skillet is completely dry, and place it on the stove on medium heat.
- Allow your cast iron skillet to heat up on the stove for approximately 5-8 minutes. This allows the pores in the metal to open so that the oil soaks in.
- Add about 2 tablespoons of a high heat oil (Crisco and avocado oil are my go-to’s) and spread it around the pan with a paper towel. Be sure to get every nook and cranny with a thin coat of oil… including the outside of the pan and the handle. TIP – Keep this paper towel, because it absorbs the excess oil, and eventually you can just use the towel for a thin layer of oil instead of always adding more oil to the pan.
- Next, grab a CLEAN paper towel and wipe up any excess oil. Remember, this is a multi-step seasoning which is important because it allows the seasoning to cure and develop a patina. You will notice that as you add additional coats of oil, that the pan will need less and less. That means you’re heading in the right direction.
- After you’ve wiped out an extra oil, place your cast iron pan in the oven just like before… upside down and with something underneath it to catch any oil that melts or burns. If you’ve applied the correct amount of oil, you shouldn’t really have any leak out of your pan.
- Bake for 1 hour at 500 degrees and then allow it to cool down completely in the oven.
*SIDE NOTE – If I could give you ONE tip about how to restore a rusty cast iron skillet, it would be that LESS IS MORE! If you add too much oil and don’t wipe enough off, then you’ll have a sticky residue on your pan after it comes out of the oven. This residue is a pain to get off, and it really stalls the process… Just another reason to take your time and only add thin layers of oil.
I repeated this whole seasoning process 3 to 4 times… so after your pan is cool, put it back on the stove and start again by adding oil with your paper towel.
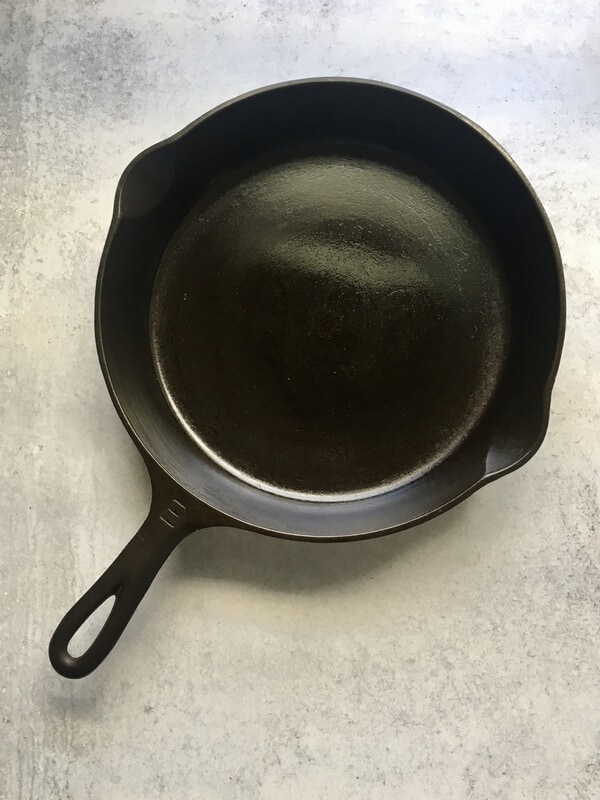
Here’s the finished product… pretty dang good, huh?!
Now comes the “egg test”…
Testing Your Newly Restored Cast Iron Skillet
Now that your rusty cast iron skillet is cleaned up and looking good as new, it’s time to test out the seasoning. And my favorite way to test out a newly seasoned cast iron skillet is to cook a fried egg in it.
Now don’t be alarmed if your very first egg sticks to the pan… the same thing happened to me. In fact, EVERY TIME that I strip down a pan to bare iron and then re-season it, the first egg sticks.
Here’s what to do if your egg DOES stick to the pan:
- Over-cook the egg.
- Scrape the egg off the bottom of the pan with something flat like a square-head wooden spatula. Be careful not to dig into your new seasoning.
- If the egg is still stuck after scraping, then you can rinse your pan with HOT water, but only rinse as a last resort. If you DO have to rinse your pan, DO NOT ADD SOAP. This is one of the very few times you will hear me say not to use soap on cast iron. That’s because your seasoning is pretty new, and you don’t want to damage it with soap.
- If you need to rinse the pan, then allow it to dry completely.
- Apply another thin layer of butter and/or avocado oil with your paper towel, and try another egg.
You can also test your seasoning by cooking scrambled eggs, because they typically take up more surface area in the pan than a fried egg, which allows you to see more sticky spots on the pan’s surface. Scrambled eggs really coat the whole pan and get deep down in the metal which helps the seasoning also.
By the time I got to egg #3 (3rd time’s the charm!), my seasoning was perfect and that egg looked like it was sliding around on glass… not bad considering I had just taken the skillet down to bare iron and brought it back from the dead!
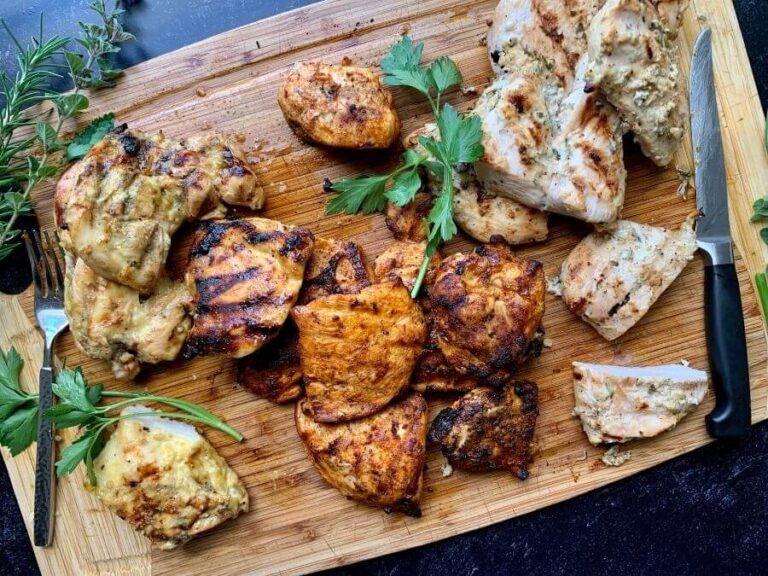
What to Cook First in Your Restored Cast Iron
Once your cast iron is seasoned, it’s really important to use it the right way for the next few cooks. You want to avoid cooking acidic foods until you are confident that your pan is “all the way seasoned”. Stay away from tomato sauce, citrus, etc. These acidic foods break down the oil in your seasoned cast iron pan.
Here are some GOOD things to cook in your newly restored cast iron skillet:
- ground beef
- steak – Check out this post on How to Cook Filet in a Cast Iron Skillet
- sausage
- bacon
- sautéed vegetables
- hamburgers
- chicken
- fried anything – fried fish, country fried steak, etc.
- grilled cheese
- quesadillas
Sautéing veggies in that avocado oil is great for your pan. Browning any meat is great. Deep frying is great.
Any time you can cook with a larger amount of fat and a higher than normal temp, you are going to help really speed up the seasoning process.
And now my rusty old (and I mean 100 years OLD!) Griswold cast iron skillet has a new life… My daughter is almost 11 and I’ve just started teaching her how to make her own scrambled eggs using that pan. She’s already calling it “her pan”, so I guess the “cast iron people” were right… these pans CAN be passed down from generation to generation.
Thanks for reading guys! If you have any questions about how to restore a rusty cast iron skillet, drop them in the comments below and I’ll do my best to help you out!


It’s cool to see the Griswold pan that you have. I have the exact same one plus a griddle and smaller skillet. I haven’t dated any of it yet. Mine came from my parents and I’m assuming it was a wedding gift? Not sure & they’ve been gone for years now. But they were the first pieces I had, of cast iron, and for some reason I just got into using them. I’ve added a few pieces of the Lodge cast iron. There’s is the only one I’ll buy. But I would like to find some more of the old Griswold. Just never really thought about searching for it. But thanks for the info. I always used bacon grease but I never really felt that worked as well as everyone else always said. I had better luck with vegetable oil and my wife wanted me to try avocado oil and that led me to this site. So again, thanks for the info
I just tried to restore 10 1/2″ skillet with lid totally flakey layers of rust when I got it I literally poured water out of it I started by trying to soak in vinegar and baking soda, then lightweight sand paper then self cleaning setting on stove which on my stove 4 1/2 hours still appeared rusty.
We found a griswold # 7 tucked in my parents basement. No heat ring, has block letters – 1930 time frame. Excited to get this ‘baby’ rust free, stripped of crud, and seasoned!! Thank you for the detailed information!
Question – I have another cast iron, I got all the rust and basically had it to bare metal except the back. I seasoned it but didn’t like the way it turned out (not confident I had all the rust off, 1st attempt ever). I am sorry to say I tried the oven cleaner method (you tube is evil in some ways) – the back is much improved but not completely crud free. The pan looks almost ‘copper’ ish color. What should I do? I planned to do the potato/salt process to make sure rust is off and do the oven cleaning process to get the rest of the crud off the back. Then season it. I want my egg to slide around (#goal). Any tips would be appreciated. Thank you
Would you be willing to help me with info on fixing my pan!? I need some guidance.