


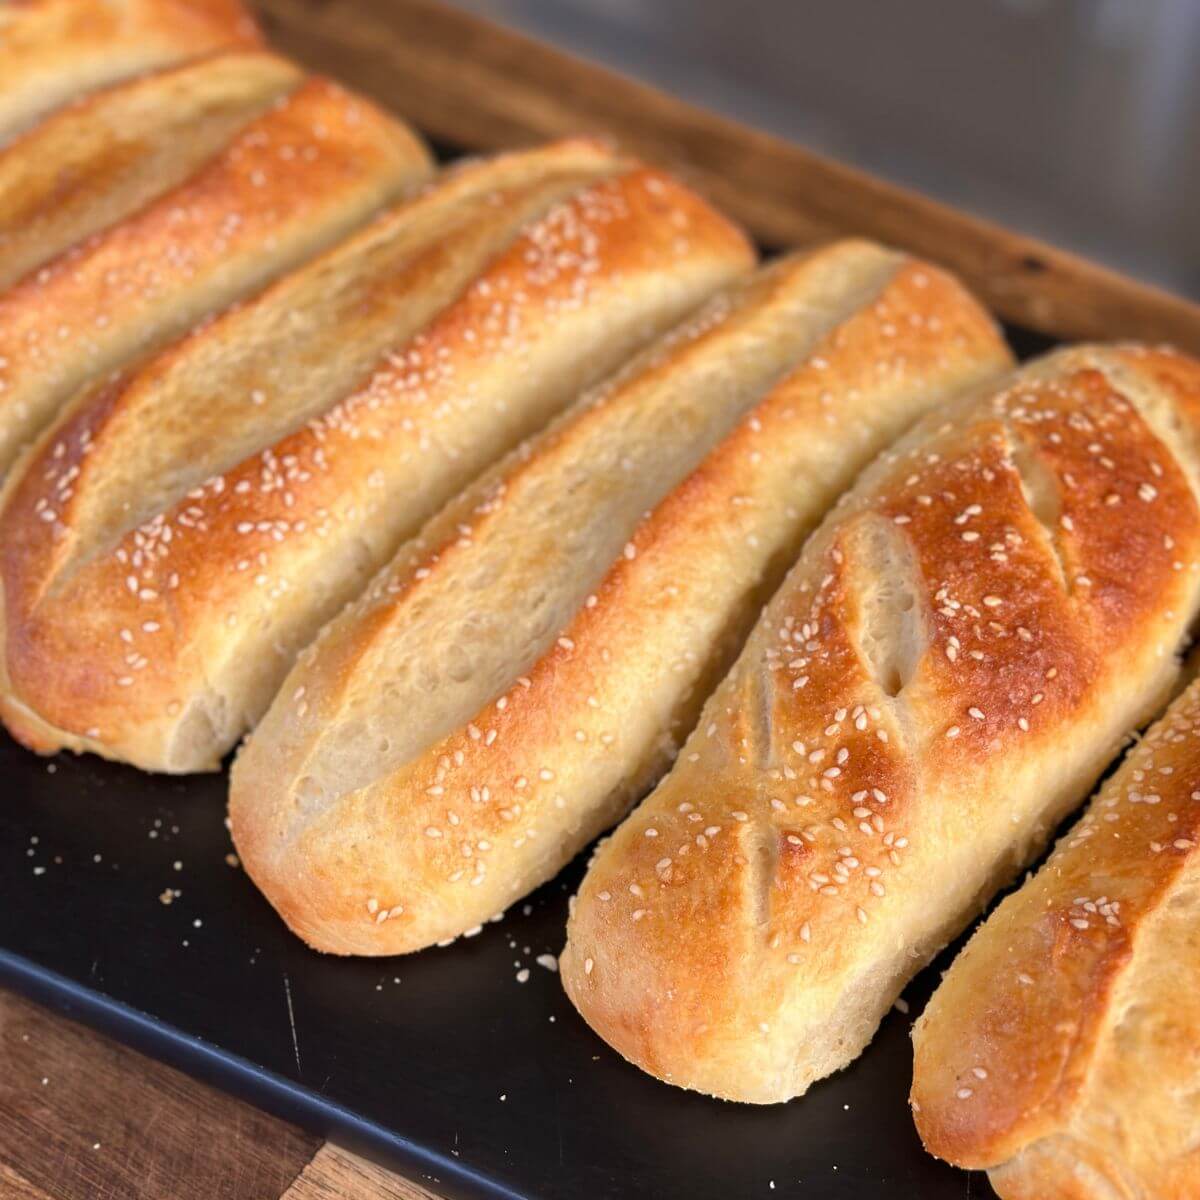
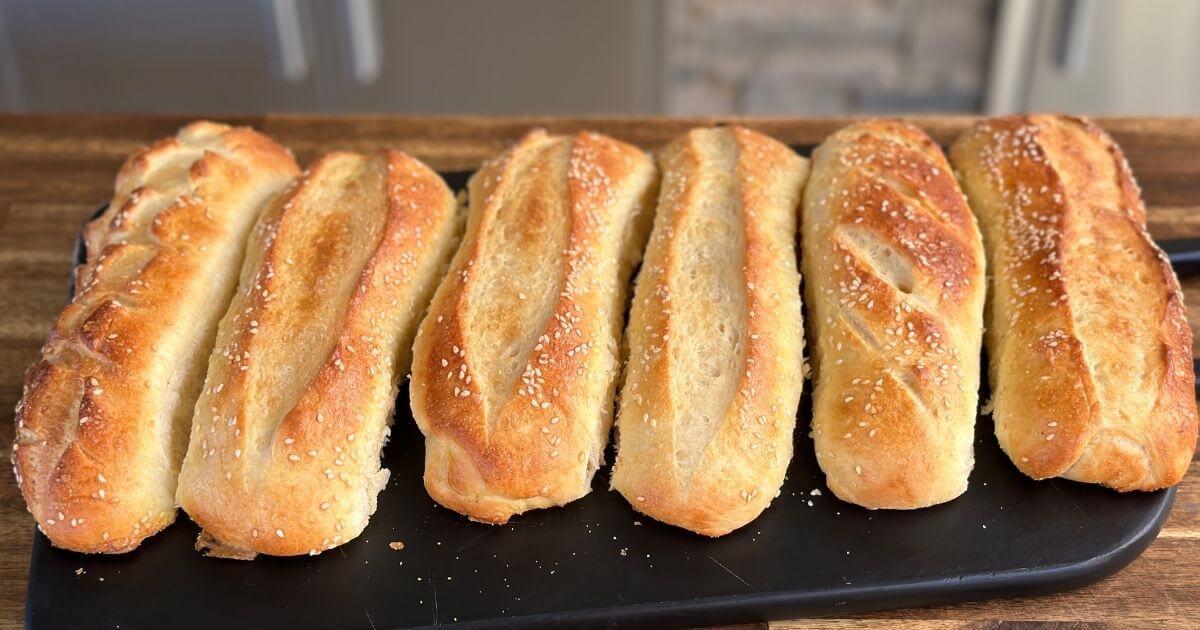
These homemade hoagie rolls are soft and tender with the perfect chew. A dusting of salt and sesame seeds before baking adds flavor and just the right amount of crunch. A truly delicious sandwich roll recipe!
There’s nothing quite as frustrating as planning the perfect cheesesteak or Italian sub, only to find that your local grocery store is completely out of proper hoagie rolls. Even worse is when you find them, but they’re those tiny, disappointing versions that are barely bigger than a hot dog bun. After searching two major grocery stores without success, I decided it was time to take matters into my own hands and master the art of homemade hoagie rolls.
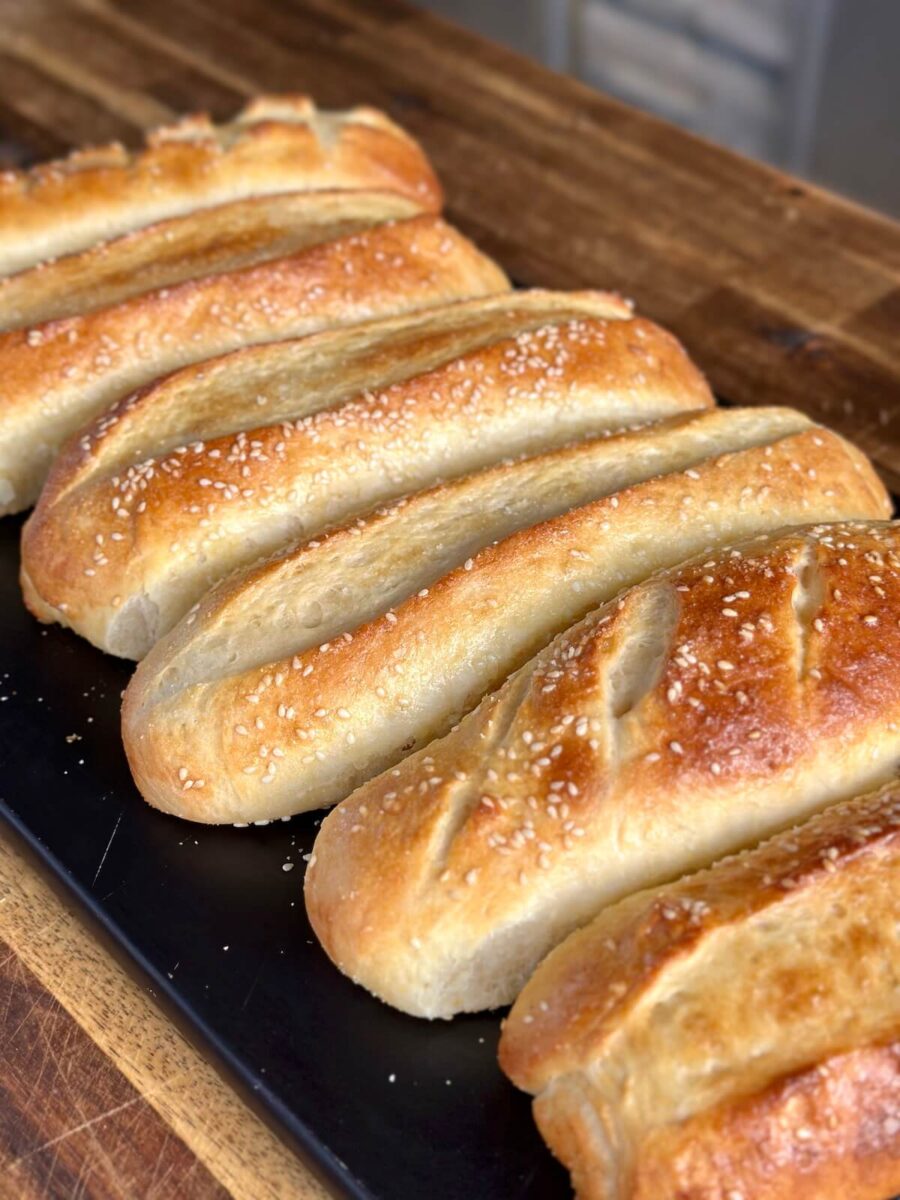
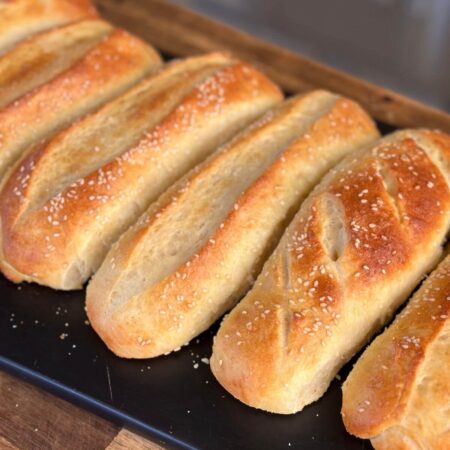
These homemade hoagie rolls are everything you want in a sandwich foundation: perfectly sized at 8 inches long, soft and pillowy on the inside with a delightfully crunchy cornmeal and sesame seed crust, and sturdy enough to hold any filling you can throw at them.
Whether you’re making cheesesteaks, chopped cheese, club sandwiches, or classic Italian subs, these rolls will elevate your sandwich game to restaurant quality.
I’ve tested this recipe multiple times to ensure consistent results, and now I’m confident you can make these at home with success every single time. The process takes a few hours from start to finish, but most of that is hands-off rising time. The actual work is minimal, and the results are absolutely worth it.
Video
Key Components to the Best Hoagie Rolls
For the Dough:
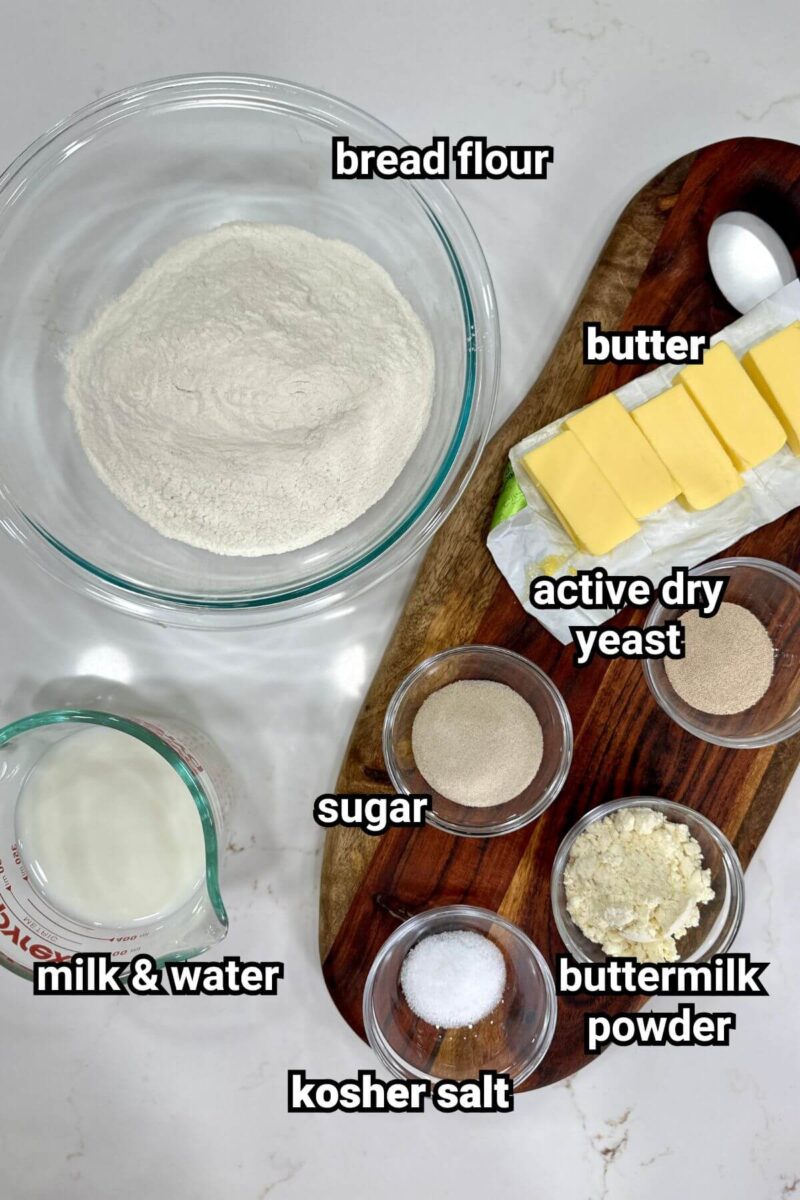
The key to these hoagie rolls is the combination of bread flour for structure, buttermilk powder for tenderness and flavor, and the right hydration level to create that perfect soft interior. You’ll need milk and water warmed to exactly 110 degrees°F to activate the yeast properly, sugar to feed the yeast and add a touch of sweetness, and softened butter for richness and a tender crumb.
About Buttermilk Powder:
Buttermilk powder is a game-changer in bread baking. Similar to dried non-fat milk that you reconstitute, it adds incredible flavor and tenderness to baked goods. While you could probably make these rolls without it, I highly recommend seeking it out. I use it in all my bread recipes including dinner rolls, cheesy rolls, sweet rolls, and cinnamon rolls. It’s even great in pancakes. And it’s nice to have on hand because it doesn’t go bad near as quickly as liquid buttermilk.
This is the one that I have used with great results.
The Cornmeal and Sesame Seed Crust:
One of the signature features of a great hoagie roll is the seeded crust. I use a combination of cornmeal on the bottom and sesame seeds rolled around the sides and top. This isn’t just for show. The seeds add a delightful nutty flavor and textural contrast that sets these rolls apart from store-bought versions.
When I visited Angelo’s in Philadelphia (which recently won a Michelin star), their bread-first approach featured prominently seeded rolls, and it made all the difference in the final sandwich.
How to Make Homemade Hoagie Rolls
Step 1: Activate the Yeast
Begin by combining your milk and water mixture (warmed to 110°F) with a small amount of sugar in a bowl (I actually like to do this in a glass Pyrex measuring cup). Stir to dissolve the sugar a bit, then add your yeast.
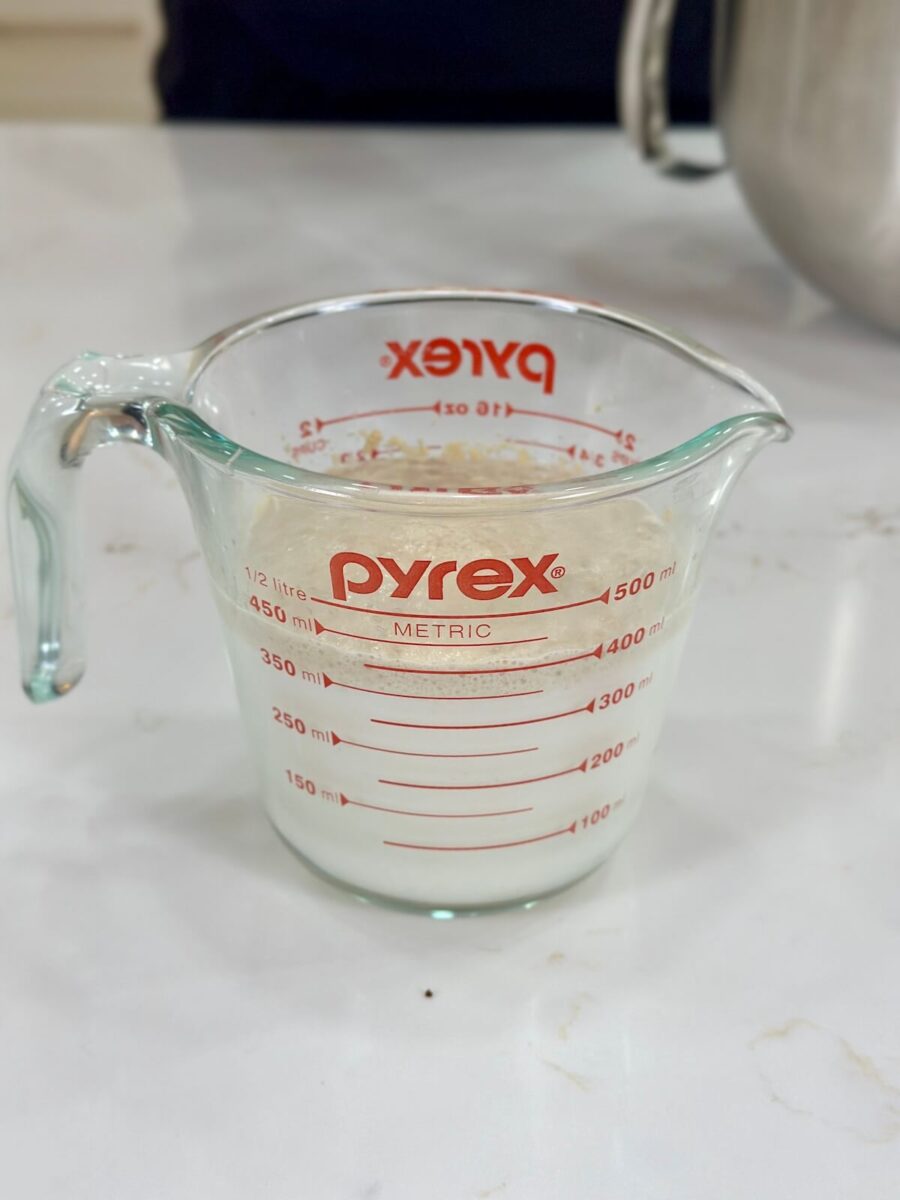
Let this mixture sit for 5-8 minutes until it becomes foamy and active. This step is crucial because it ensures your yeast is alive and ready to work. If your mixture doesn’t foam up after 8 minutes, your yeast may be old or the liquid temperature may have been off. Start over with fresh yeast if this happens.
Step 2: Mix the Dry Ingredients
While your yeast activates, sift together bread flour, buttermilk powder, the remaining sugar, and salt. I prefer to sift the dry ingredients directly into the bowl of my stand mixer to eliminate extra dishes. Sifting is important to break up any clumps, especially from the buttermilk powder and salt. Use a spatula to work through any bits that remain in the sifter until everything is smooth and well combined.
Step 3: Form the Dough
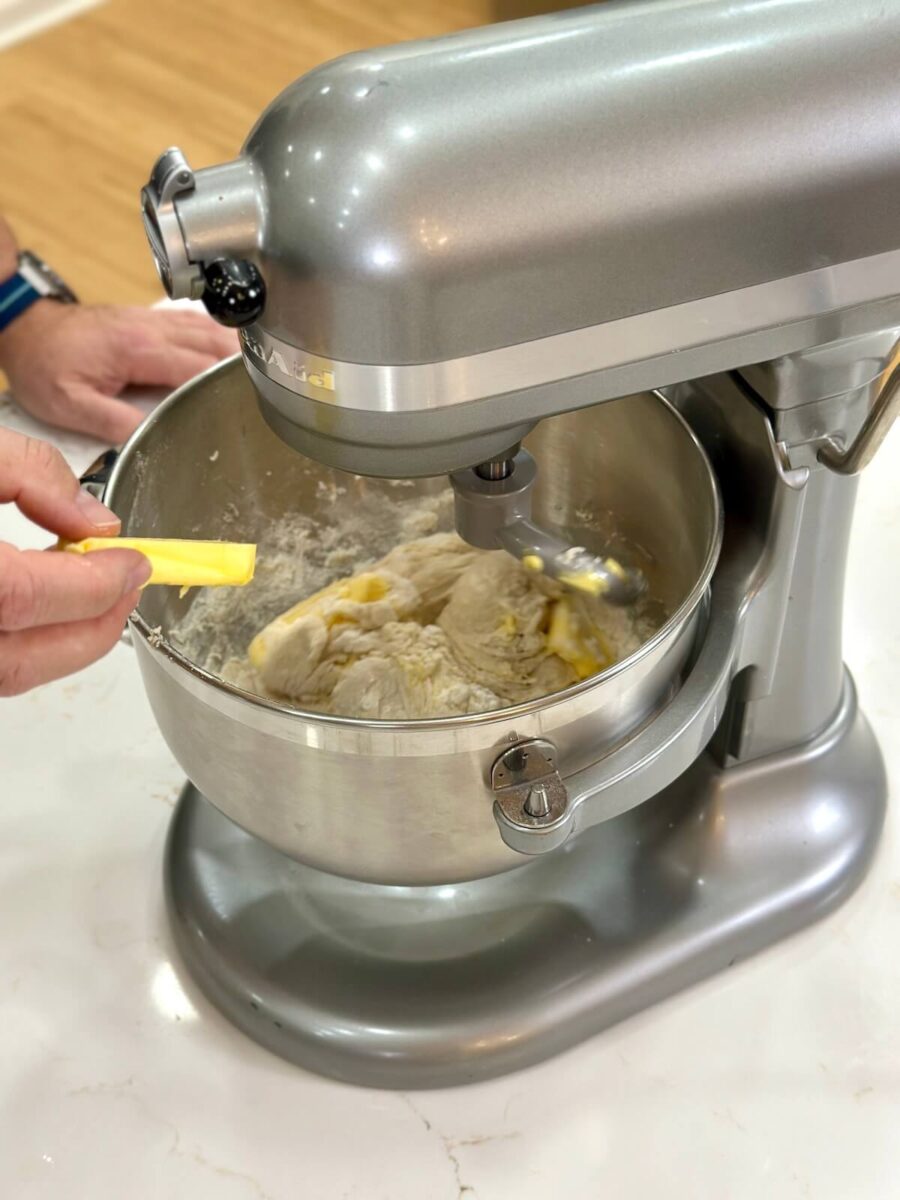
Attach the dough hook to your stand mixer and turn it on low. Pour in your activated yeast mixture and let it begin incorporating into the dry ingredients. Before adding the butter, you want to make sure the dough is starting to come together. Stand mixers with dough hooks can sometimes need a little help at first, so don’t be afraid to stop and scrape down the sides.
Once the dough begins forming, start adding your softened butter gradually. Keep the mixer on low while the butter incorporates, then increase to medium speed. Mix for 5-8 minutes total until the dough pulls away cleanly from the sides of the bowl. The dough should be slightly sticky but not wet, and it should clean off your hands easily when you touch it.
Troubleshooting Dough Consistency:
If your dough is too wet and sticky, lying flat in the bowl rather than forming a ball, add flour one tablespoon at a time. Different flour brands react differently, and humidity affects hydration. Let each tablespoon incorporate fully before deciding if you need more. The goal is dough that’s on the verge of sticking but pulls away cleanly.
Step 4: First Rise
Dump the dough out of the bowl onto a clean counter or work surface. To shape the dough before rising, simply pull the edges toward the center to create a taut, smooth ball, then seal the bottom. This creates surface tension that helps the dough rise evenly.
Place the dough seam-side down in an oiled bowl (I just oil the mixing bowl that the dough came out of), cover with a tea towel, and let it rise on your countertop for about 1 hour. The dough should double in size.
Step 5: Divide and Shape
After the first rise, punch down the dough to release the gas. If you have a kitchen scale, divide the dough into 6 equal portions of approximately 5.9-6 ounces each. If you don’t have a scale, simply eyeball it and cut the dough into 6 pieces as evenly as possible. Don’t stress about being exact to the gram. Nobody will measure your finished rolls.
Prepare a baking sheet by covering it with a piece of parchment paper and then dusting it lightly with cornmeal.
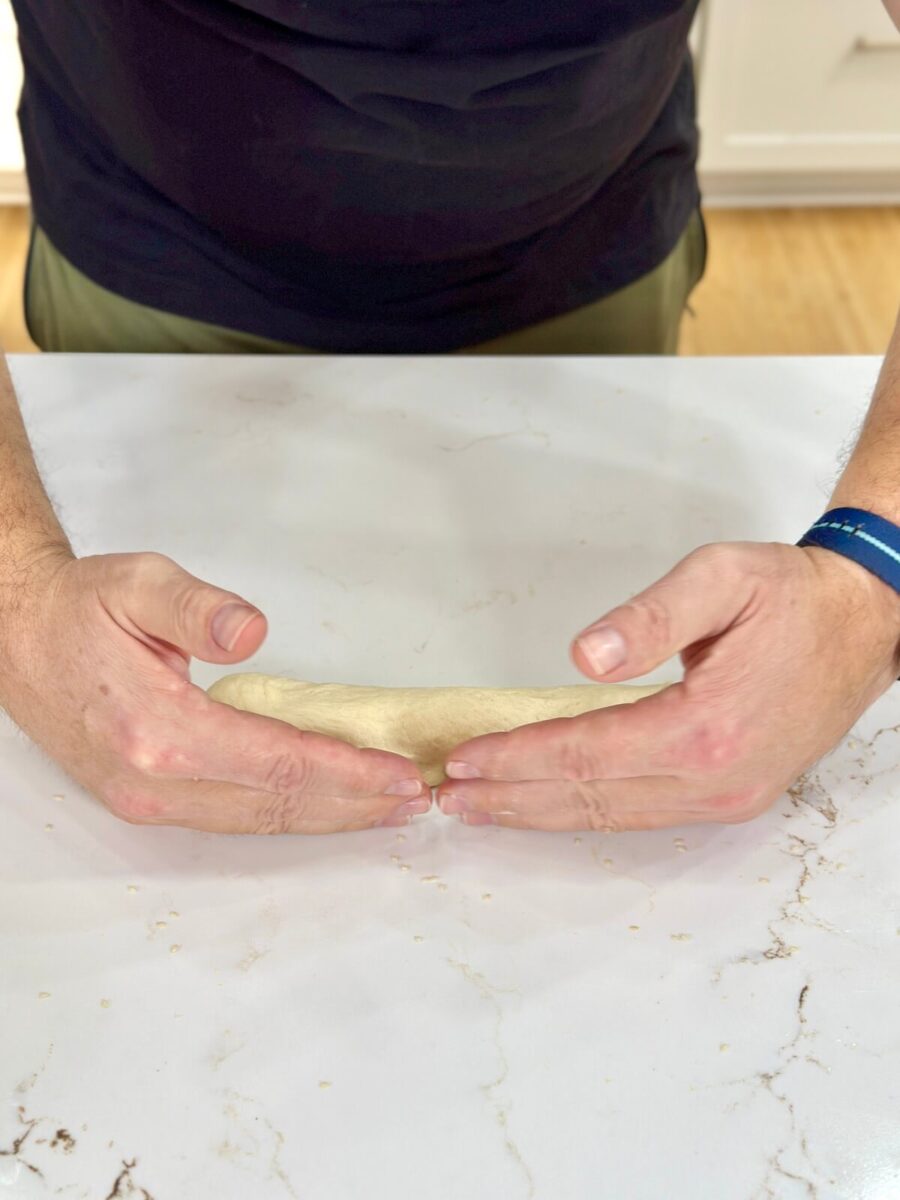
Now comes the shaping. Take each portion and gently roll it into an 8-inch log. I prefer to place one piece on the counter and cup my hands around the dough, and pull it towards me. As you pull the dough across the counter, it will naturally roll and thin out into a log shape. Continue pulling the dough (see the photo above) until you get a log shape.
The key is to avoid overworking the dough. Let the dough naturally funnel into shape as you roll it across the counter.
Step 6: Add the Seeds
Once your logs are shaped, roll them in sesame seeds to coat the sides and top. This gives you that classic hoagie roll appearance and adds wonderful flavor and texture.

Arrange the shaped rolls on your cornmeal-dusted baking sheet, leaving space between them for expansion during the second rise.
Step 7: Second Rise
Cover the shaped rolls with plastic wrap or a tea towel and let them rise for another 45 minutes. They should puff up noticeably but won’t quite double in size like the first rise.
Step 8: Score and Glaze
Preheat your oven to 375°F. While it heats, prepare your egg wash by mixing one egg yolk with a tablespoon of melted butter and a splash of extremely hot water. This creates a beautiful golden, shiny crust.
Before applying the egg wash, score the tops of your rolls. Use a sharp knife, bread scoring tool, or clean razor blade to make one slit along the length of the top or diagonal slits. This isn’t just decorative. Scoring allows the rolls to expand properly in the oven without bursting in random places.
Brush the egg wash over each roll, making sure to cover the entire top. Finally, sprinkle a light pinch of salt over the tops. Not too much, just enough to add a subtle savory note that enhances all the other flavors.
Step 9: Bake
Bake the rolls at 375°F for approximately 20-25 minutes, or until they’re golden brown. The internal temperature should reach about 190°F if you want to check with a thermometer.
Step 10: Cool and Enjoy
Let the rolls cool on a wire rack for at least 15-20 minutes before slicing. The bread will continue to set during this time. When you’re ready to use them, slice them open and admire that perfect, fluffy interior with the crunchy, seeded exterior.
What sandwiches work best for homemade hoagie rolls?
These rolls are incredibly versatile. They’re perfect for cheesesteaks, Italian subs, meatball subs, chopped cheese sandwiches, club sandwiches, pulled pork, chicken sandwiches, and any other hearty sandwich filling you can imagine. The sturdy structure and 8-inch length make them ideal for generous portions of fillings.
Recipe Tips
- Temperature Matters – The 110-degree temperature for your liquid is critical for yeast activation. Too hot and you’ll kill the yeast. Too cold and it won’t activate properly. Use an instant read thermometer to test.
- Watch the Dough Consistency – The dough should be tacky but not sticky. It should pull away from the bowl and clean off your hands. Different flours absorb water differently, so be prepared to adjust with small amounts of flour if needed.
- Don’t Overwork During Shaping – When rolling your 8-inch logs, work gently and let the dough do most of the work. Overworking will press out too much air and result in dense rolls.
- Don’t Skip the Cornmeal Crust – Adding a light dusting of cornmeal to the bottom of your sheet tray before proofing your dough will give you a delicious slightly crunchy crust.
The seeds are traditional and add great flavor and texture, but they’re not mandatory. If you prefer plain rolls, simply skip the sesame seeds. You can also experiment with other toppings like everything bagel seasoning, or simply leave them plain. However, I definitely recommend dusting the sheet tray with cornmeal – it adds a nice texture on the bottom of the rolls.
While I haven’t tested the recipe without it, bread recipes are generally forgiving, so you could simply omit it. The rolls may have a slightly different flavor and texture, but they should still work. However, I really do recommend trying to find buttermilk powder because it adds such wonderful flavor to all kinds of baked goods. The kind that I use is a one to one substitute for regular buttermilk, so it is handy to have for other things like pancakes and homemade cinnamon rolls as well.
Store cooled rolls in an airtight container or plastic bag at room temperature for up to 3 days. Because there are no preservatives, they really won’t last longer than that. For longer storage, freeze them in a freezer bag for up to 3 months. Thaw at room temperature or warm in a 250-300°F oven for a few minutes to refresh them.
Homemade Hoagie Rolls
Equipment
- stand mixer with dough hook attachment
Ingredients
For the Dough:
- 3¾-4 cups bread flour, plus more as needed approx 500 grams
- 1 cup milk
- ½ cup water
- 2¼ teaspoons active dry yeast 1 packet
- 2 tablespoons granulated sugar divided
- 3 tablespoons buttermilk powder
- 1½ teaspoons salt
- 4 tablespoons unsalted butter, cubed and room temperature
- 1-2 tablespoons neutral oil for greasing bowl
For Assembly:
- 2-3 tablespoons cornmeal for dusting
- ¼ cup sesame seeds
- 1 egg yolk
- 1 tablespoon melted butter
- 1 tablespoon very hot water
- kosher salt for sprinkling
Instructions
- Activate the Yeast: In a small bowl, combine milk and water heated to 110°F. Add about 2 teaspoons of the sugar. Stir to dissolve, then sprinkle the yeast over the top. Let sit for 5-8 minutes until foamy and active. *If the mixture doesn't foam, your yeast may be old or the liquid temperature incorrect; start over with fresh yeast.
- Mix Dry Ingredients: In the bowl of a stand mixer, sift together the bread flour, buttermilk powder, remaining sugar, and salt. Use a spatula to work through any remaining clumps in the sifter until the mixture is smooth and uniform.
- Form the Dough: Attach the dough hook to your mixer. Turn to low speed and pour in the activated yeast mixture. Mix until the dough begins to come together, about 2 minutes. With the mixer running on low, gradually add the softened butter a little at a time. Once all butter is incorporated, increase speed to medium and knead for 5-8 minutes until the dough pulls cleanly away from the sides of the bowl. The dough should be slightly tacky but not sticky, and should clean off your hands easily.
- Adjust Consistency if Needed: If your dough is too wet and not forming a ball, add flour 1 tablespoon at a time, mixing well after each addition, until it reaches the proper consistency. Different flour brands and humidity levels affect hydration.
- First Rise: Turn the dough out onto a clean surface and shape into a smooth ball by pulling the edges toward the center and pinching to seal. Lightly oil the mixing bowl. Place the dough ball seam-side down back into the oiled bowl. Cover with a tea towel and let rise on the counter for 1 hour. Dough should be doubled in size.
- Divide the Dough: Punch down the risen dough to release gas. Divide into 6 equal portions, approximately 5.9 ounces each if using a scale. If not using a scale, eyeball 6 equal pieces.
- Prepare Baking Sheet: Line a baking sheet with parchment paper. Then dust with the cornmeal.
- Shape the Rolls: Working with one piece at a time, gently roll and stretch the dough into an 8-inch log. Work gently to avoid pressing out too much air. Let the dough naturally form a cylinder as you roll it between your palms and the counter, smoothing out any large air pockets. Avoid overworking the dough.
- Add Seeds: Sprinkle sesame seeds onto your work surface. Roll each shaped log in the sesame seeds to coat the sides and top. Place seeded rolls on the prepared baking sheet, spacing them about 2 inches apart to allow for expansion.
- Second Rise: Cover the shaped rolls loosely with plastic wrap or a tea towel. Let rise on the counter for 45 minutes until puffy and expanded.
- Preheat Oven: While the rolls rise, preheat your oven to 375°F.
- Prepare Egg Wash: In a small bowl, whisk together the egg yolk, melted butter, and hot water until smooth.
- Score and Glaze: Using a sharp knife, razor blade, or bread scoring tool, make 3-4 diagonal slashes across the top of each roll at a 45-degree angle, or one long slit along the length of the top. Brush the egg wash generously over each roll, making sure to coat the entire surface. Lightly sprinkle kosher salt over the tops.
- Bake: Bake for 16-18 minutes, or until the rolls are golden.
- Cool: Transfer rolls to a wire rack and let cool for at least 15-20 minutes before slicing. The bread will continue to set as it cools.
Notes
- Buttermilk Powder: I have been using this as a buttermilk replacement for years, because it is shelf-stable and convenient to have on hand for baking. Look for it in the baking aisle or online. You can omit it if you wish, but the results may vary slightly in flavor and texture. I use the SACO brand of cultured buttermilk powder.
- Temperature Control: The 110°F liquid temperature is crucial for yeast activation. Use a thermometer for accuracy. Too hot kills the yeast; too cold won’t activate it properly.
- Storage: Store cooled rolls in an airtight container at room temperature for up to 3 days, or freeze in a freezer bag for up to 3 months. Thaw at room temperature or refresh in a 250-300°F oven.
- Seed Variations: While sesame seeds are traditional, you can experiment with everything bagel seasoning or leave the rolls plain if preferred.


No stand mixer: Can you write recipe for using a hand mixer and kneading dough by hand?
I’m hardly a bead maker, but these are super and easy to make. Another home run, like everything Neal puts out.
I love sesame seeds but have to pass on them since I’m very allergic to them. These rolls are great without.
Hey Ralph! So glad you love the hoagie recipe – they’re a winner for sure!
Greetings Neal,
First, thank you for all the work you and Amy do to provide us all with such great recipes for the flat top. And thank you for your service, too.
Just wanted to share something with you about the buttermilk powder. I’ve been using it for years, as well, especially in my homemade flaky biscuits recipe. I’ve found that keeping the powder stored in a mason jar with a ring and a lid is the best way to keep it. The powder is a dessicant, and will absorb any moisture out of the air and get hard. So, once I open a new container, what I don’t use right then, I place in one of these jars with a seal, and it makes a huge difference in keeping it ready to use.
Take care, and keep up the great work!
Rhett Mahaley
Iron Station, NC