


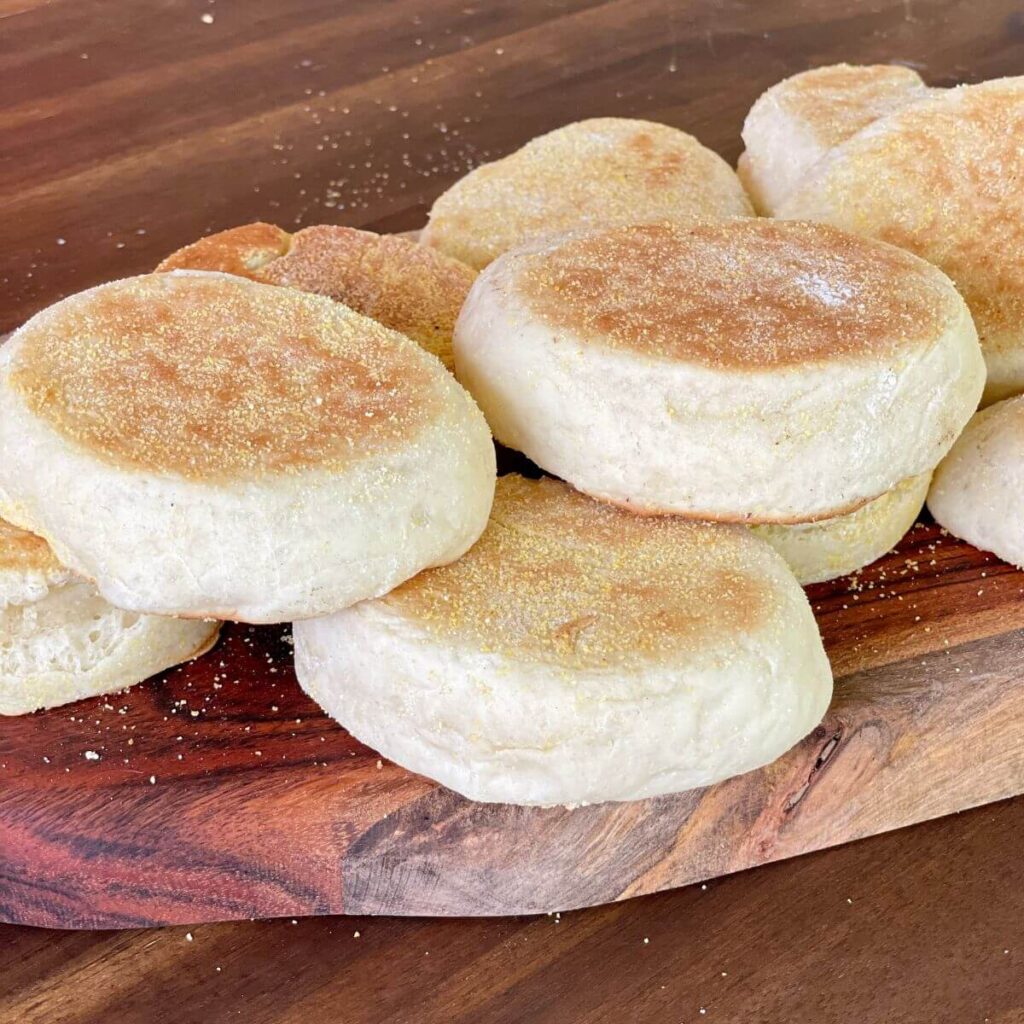
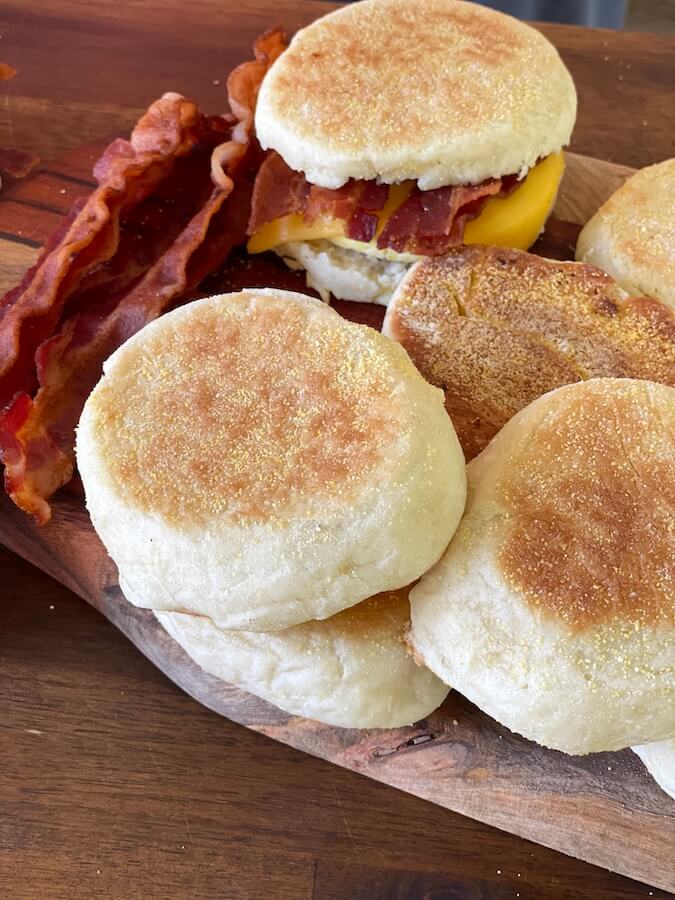
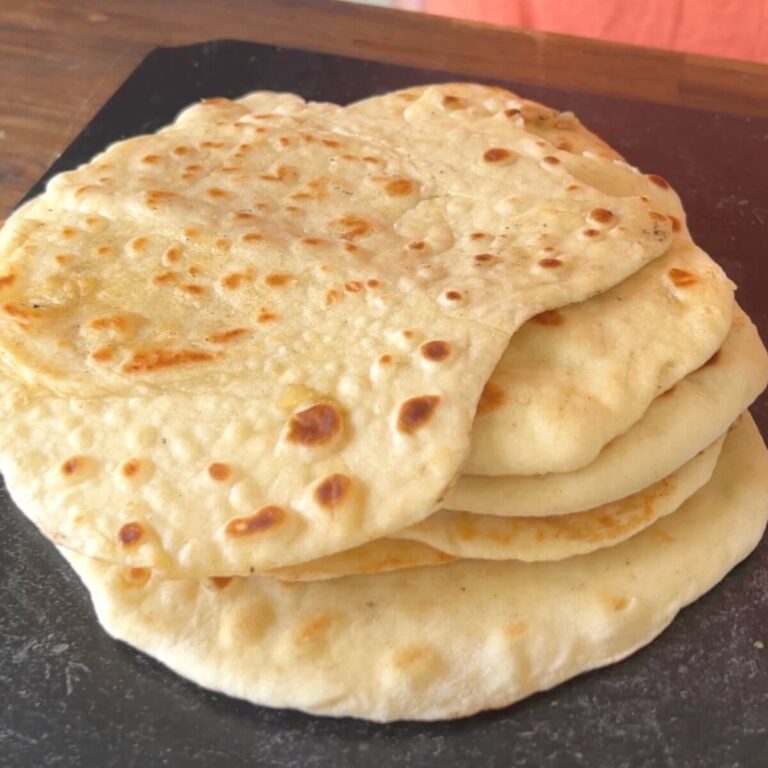
These tender and flavorful homemade English muffins are made right on the griddle! Perfect for serving with your homemade jam or turning into an awesome english muffin griddle breakfast sandwich!
English muffins are typically “baked” in a skillet on the stovetop, NOT in the oven like most dough products. And since an outdoor griddle is basically just a large skillet, homemade English muffins are the perfect breakfast recipe to make on your Blackstone griddle or other flat top grill!
Ingredients for English Muffins
Want to try your hand at making your own homemade English muffins on the Blackstone? You’ll need these common baking ingredients:
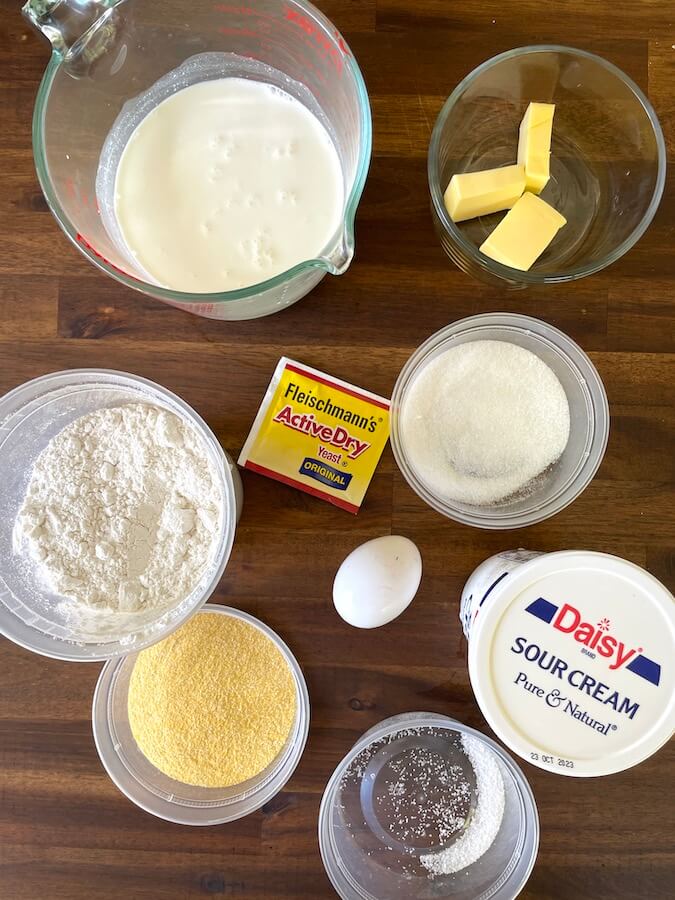
- active yeast – I used the Fleischmann’s brand ActiveDry Yeast. Just be sure that your yeast is not expired.
- all purpose flour
- sugar
- fine cornmeal or semolina – Try to find the finer cornmeal instead of a coarse cornmeal for the iconic texture and flavor of classic English muffins.
- salt
- sour cream
- egg
- melted butter
- milk and/or heavy cream
How to Make Homemade English Muffins on the Griddle
Before we get into how to make homemade English muffin dough, you need to remember one thing – this is a very WET dough! And the dough will probably be unlike any other bread or biscuit dough that you’ve worked with before. So don’t be alarmed.
That being said, if you don’t mind a little bit of mess and stickiness, these homemade English muffins on the griddle are fantastic and full of flavor! Here’s how to make them:
Feeding the Yeast
The first step to making most doughs is making sure that your yeast is active and alive, and that involves “feeding” the yeast so that is starts to bubble up and create gas. I’ll spare you all of the scientific details, but just know that the process is very easy.
Start by microwaving a mixture of milk and water until it reaches about 110 degrees F. This is where your instant read internal probe thermometer comes in handy – no, it’s not just a griddle accessory! The warm liquid reactivates and “wakes up” the yeast, and it causes the yeast to produce the gas a little bit faster.
Once the milk and water is heated, just sprinkle the packet of yeast on top and add a few pinches of sugar. Then, stir the mixture briefly to incorporate all of the ingredients, and let it sit undisturbed for about 10 minutes so that the yeast can “feed”. After about 10 minutes, you should notice that your liquid has a frothy appearance on the top like this:

Making the Homemade English Muffin Dough
Next, it’s time to mix all of the English muffin dough ingredients together.
Add the yeast, sugar, and milk mixture to the bowl of a stand mixer. If needed, scrape down the side of your bowl that you used to feed the yeast to make sure that you get all of the ingredients into the dough.
Then, add butter, a beaten egg, sour cream, flour, salt, and the rest of the sugar to the mixer bowl. Turn the mixer on to a low speed for a few minutes so that all of the dry ingredients can get incorporated. Then, turn the speed up to medium and mix the dough for about 5-8 minutes.
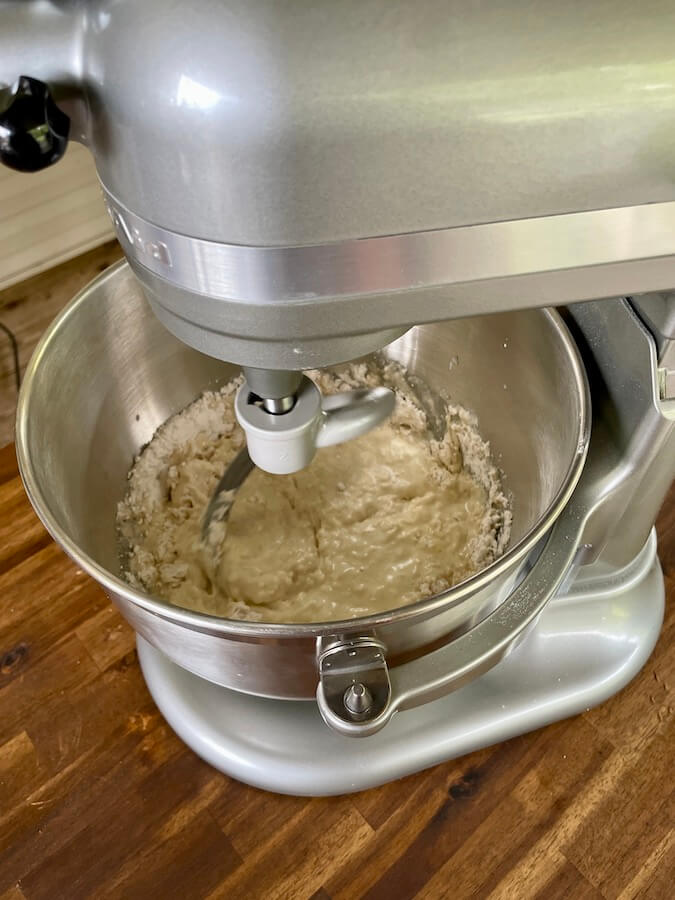
You’ll start noticing the dough pulling away from the sides of the bowl, but the dough will still look pretty wet. Remember, this is not your typical bread dough. Don’t expect it to climb up your dough hook or become dry and crumbly.
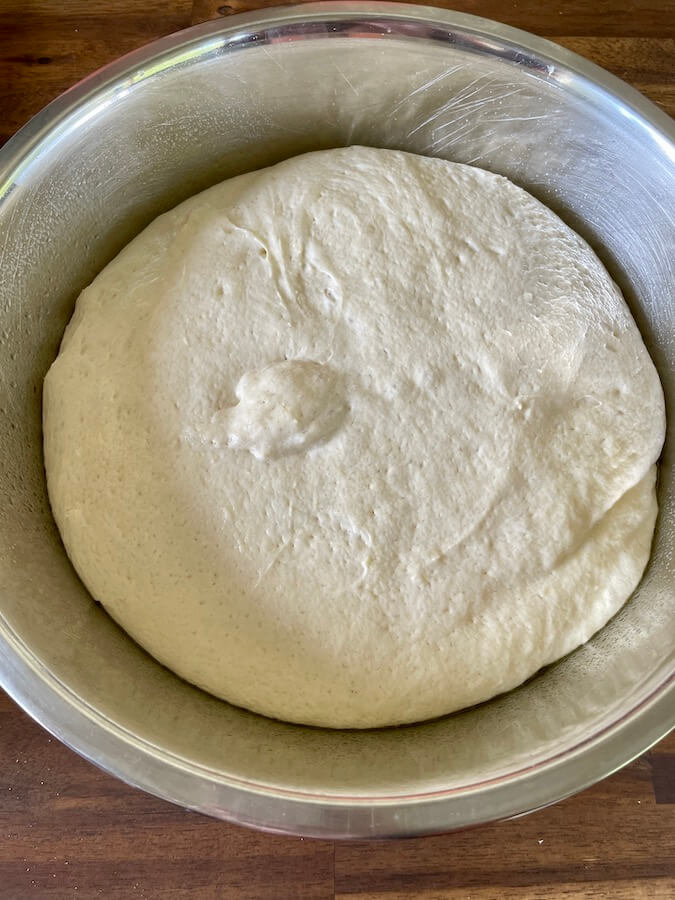
Letting the Dough Proof
Once the dough is mixed, turn it out into a large oiled bowl. I just used an extra virgin olive oil cooking spray to easily oil my mixing bowl like this:

Then, cover the dough with plastic wrap and set it on the counter at room temperature for about an hour and a half. After that time, your dough should have nearly doubled in size to look something like this:
Forming the Dough into English Muffins
While your dough is proofing, cover a large baking sheet with parchment paper. Then, sprinkle a hefty amount of fine cornmeal on to the parchment paper in an even layer and set it to the side.
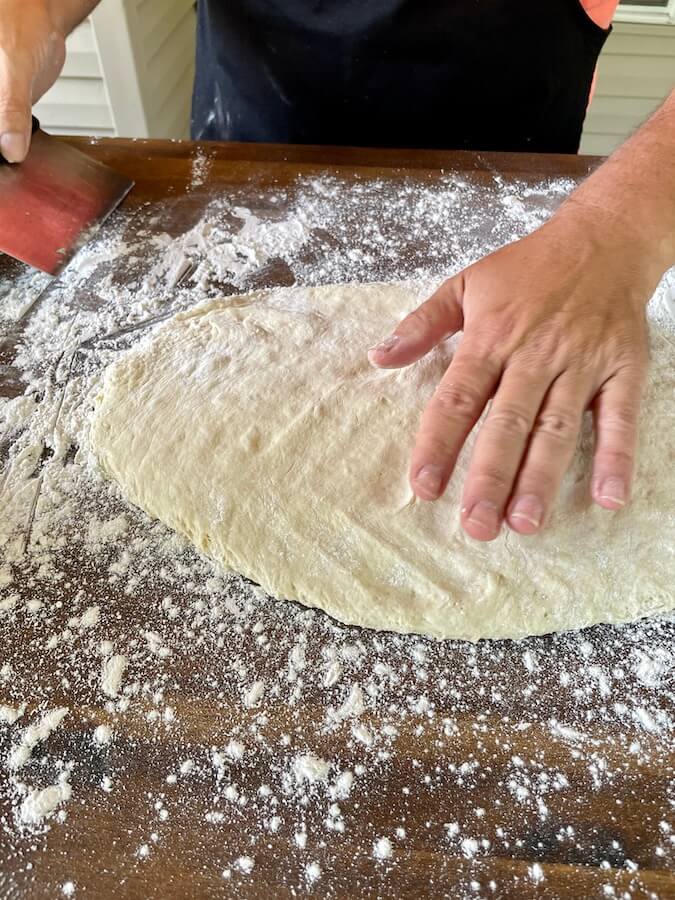
Then, when the dough is ready, turn it out onto a floured work surface and pat the dough into an even “sheet” that’s about 3/4″ thick like this:
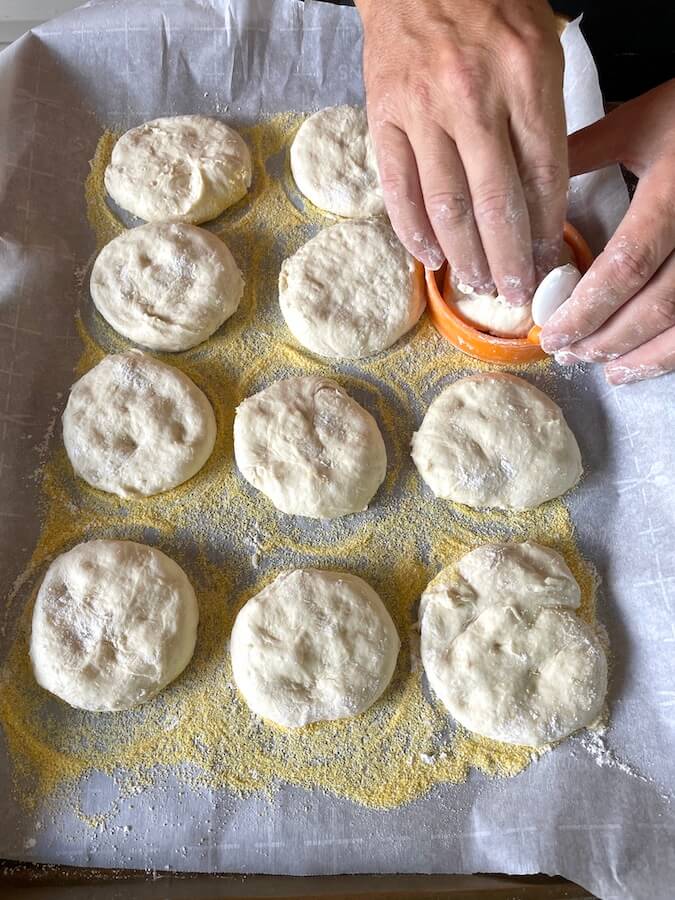
Next, use a floured biscuit cutter to “cut out” the individual English muffins… but don’t let the biscuit cutter fool you! Even though you’re cutting the dough like you would for biscuits or cookies, you won’t be able to easily separate and pick up the individual dough circles. Instead, the biscuit cutter only serves to portion out the dough into equally sized muffins. You will still need to work it just a bit to get the perfect shape for your English muffins.
If you find that the wet and sticky dough is very difficult to cut, then you can add flour to the edges of your biscuit cutter in between cutting each muffin.
Once the biscuits are cut out, lightly form them with your floured hands into 3″ circular shapes. They don’t have to be perfect, just do your best to get them evenly round. Then, lay each muffin round on the prepared cornmeal-dusted parchment paper.
*NOTE – I used a 3 inch biscuit cutter to portion my English muffin dough, and I found that size to be perfect!
As you’re working to portion out and shape the dough, try not to disturb it too much. You want the air pockets to remain intact as best as possible, because that’s what gives you the infamous “nooks and crannies” of classic English muffins.
I also used a floured silicone egg mold as a guide to help form the dough into muffin shapes like this:
With the leftover dough that remains after you’ve portioned out the muffins, you can knead it together just a bit and re-shape it for additional English muffins… similar to what you would do for roll-out sugar cookies.
Then, when the muffins are prepped, sprinkle some more cornmeal on the tops, loosely cover the baking sheet with plastic wrap, and allow them to sit and proof again, this time for about 30-45 minutes. After that time, you’ll notice that any indentions in the muffin tops from where you lightly pressed them out, should be smoothed out a bit and your English muffins will have more of a soft, pillowy appearance.
*NOTE – When you’re placing the individual muffins on the parchment paper, be sure to leave about 1-2″ in between for the dough to proof and expand a bit. That way your English muffins don’t stick together.
Cooking the Homemade English Muffins on the Griddle
There are two important tips to remember when cooking homemade English muffins on the griddle:
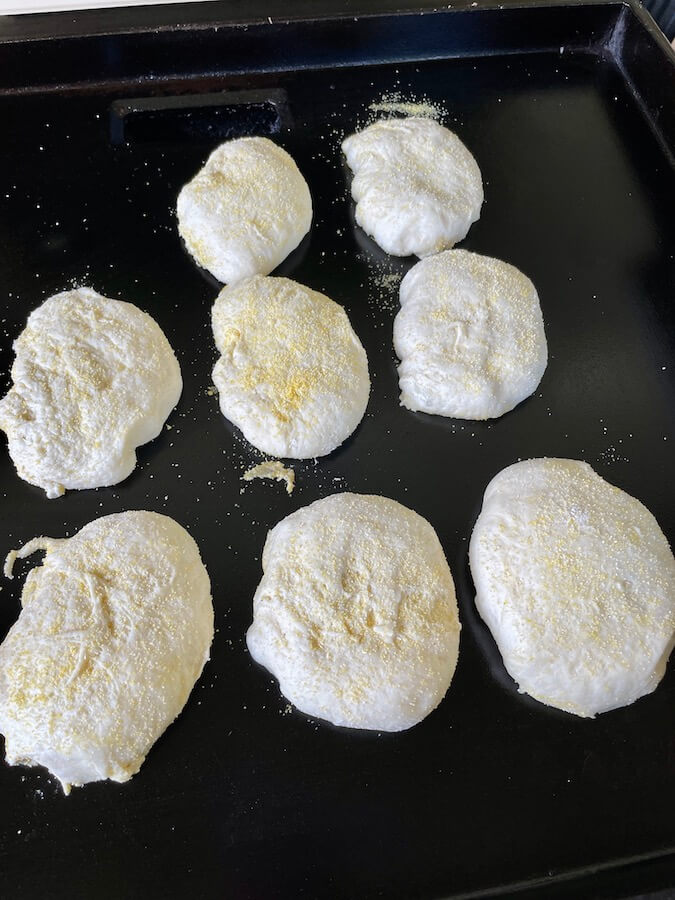
- Start with a dry griddle. You don’t want the flat top grill surface to be too lubricated with oil or butter, because this dough is not meant to spread. Before placing the proofed dough on the griddle, just use a wad of paper towels to wipe away any excess oil or grease from the griddle surface.
- Cook the English muffins at a low temperature. Depending on what griddle you have, you may need to adjust your burners and possibly alternate your griddle knobs, keeping one burner off and the next burner on, to achieve the perfect low temperatures for these muffins. Try to maintain a griddle surface temp of about 300-350 degrees F so as not to burn the bottoms of the muffins before the center fully “bakes”.
To start, you need to get the muffins off the parchment paper and on to the griddle. I found it easiest to use my griddle spatula to get under the muffins and gently place them on the griddle. Then, allow them to cook for about 5-7 minutes on the first side. After about 5 minutes, start checking the under sides of the muffins for doneness and color, just like you would do for griddle pancakes.
When the bottoms have a nice golden brown color and the muffins are “set up”, flip to the second side and cook an additional 5-7 minutes, or until the muffins are cooked through.
With cooking the English muffins on the flat top grill, you’re actually “baking” the muffins, so it’s a slow process… much different than most griddle cooking.
And just like a biscuit, you need to make sure the English muffins cook all the way through. You may need to turn your burners off if you notice the griddle temperature climbing too much, or you can use an aluminum steam pan to “dome” the muffins as well.
I used the Traeger griddle to make my griddle English muffins, and I found that I had to turn off the burners for a few minutes to bring the griddle temp back down to about 325 degrees F. Then, after the muffins had cooked for about 5-6 minutes on each side, I placed them under an aluminum pan to trap in the heat and create more of an oven effect.
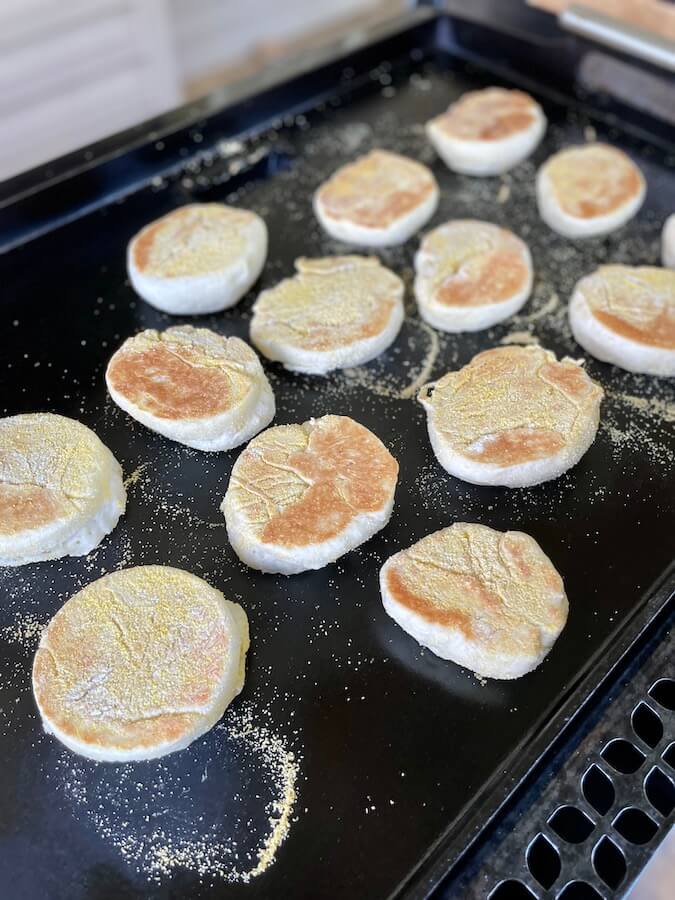
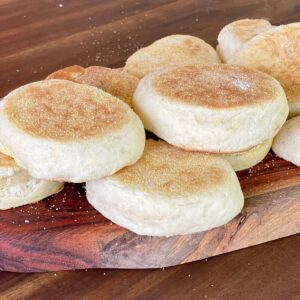
And once your homemade English muffins are nicely golden brown on both sides and cooked through, then they’re done!
Be sure to use a fork to split the English muffins, instead of using a knife to cut them in half. Just gently insert the prongs of a fork into the middle side of the muffin, turn the muffin, and insert the fork a few more times until the English muffin can be easily split in half.
Serve these fantastic flavorful homemade English muffins with your favorite jam and butter, or since your griddle is already out and warmed up, cook up some bacon and perfect griddle eggs to make your own English muffin breakfast sandwich!
Homemade English Muffins on the Griddle
Ingredients
- 1 packet instant yeast
- ½ cup heavy cream
- ½ cup water
- ¼ cup milk
- 2 ½ tablespoons sugar
- 3 ⅔ cup all purpose flour
- 3 tablespoons melted butter
- ¼ cup sour cream
- 1 large egg beaten
- 1 teaspoon salt
- cornmeal for dusting
Instructions
- In a microwave-safe bowl, heat water, cream, and milk to about 110℉. Add 2 pinches of the granulated sugar, reserving the rest for the dough. Stir to dissolve the sugar. Sprinkle the yeast on top of the liquid and stir together. Set to the side for about 7-10 minutes, or until a foam develops on top of the mixture.
- While the yeast is activating, add flour, salt, melted butter, a beaten egg, sour cream, and the remaining sugar to the bowl of a mixer fitted with a paddle attachment. When the yeast is ready, pour the yeast/milk mixture into the bowl with the other ingredients. Mix on low speed for about 2-3 minutes. Then increase the speed to medium and mix for an additional 6-7 minutes until the dough is smooth, scraping down the sides as necessary.
- Transfer the dough to a large oiled bowl, and cover with plastic wrap. Allow the dough to proof for about 1 ½ hour in a warm area. After that time, the dough should have doubled in size.
- Cover a large baking sheet (or two baking sheets) with parchment paper. Sprinkle the parchment with a thin even layer of cornmeal. Set to the side.
- Turn the dough out on to a floured surface, and pat it out with floured hands into an even layer about ¾" thick. Use a floured 3" biscuit cutter to cut/portion out the dough. *NOTE – The dough will be very sticky, and you will not be able to pick up the cut dough circles. The biscuit cutter is more for equally-sized muffin portions.
- Use a thin spatula to scrape up the muffin dough circles and transfer to the prepared parchment paper, leaving about 1-2 inches of space in between each muffin. If needed, you can re-shape the cut dough portions into circles on the parchment paper. Sprinkle the tops with more cornmeal, and loosely cover with plastic wrap. Allow to proof for 30-45 minutes.
- Heat griddle on lowest setting to about 325-350℉. *Depending on what griddle you have, you may need to alternate burners or only turn 1-2 burners on.
- Gently place the english muffins on the warm, dry griddle. Cook on the first side for about 5-7 minutes, or until the bottoms are lightly golden brown. Then flip to the second side and cook an additional 5-7 minutes, or until cooked through. *If needed, you can place an aluminum pan or dome on top of the muffins to create an oven effect.
- Once English muffins are lightly golden brown on both sides and cooked through, remove from the griddle. Use a fork to split the muffin in half, not a knife to cut them in half. Serve with butter and your favorite jam, or add your favorite breakfast meat and eggs for a homemade English muffin breakfast sandwich. Enjoy!
Video
Notes
- This dough is very sticky, much different than typical bread or biscuit dough. Don’t be alarmed!
- When you’re placing the individual muffins on the parchment paper, be sure to leave about 1-2″ in between for the dough to proof and expand a bit. That way your English muffins don’t stick together.
- For best results, start with a dry oiled griddle. Just take a wad of paper towels and dry off any excess oil on the griddle surface so that the muffin dough does not spread.
- Allow the dough to proof in a warm or room temperature spot, like outside or on the counter. However, don’t place the dough in direct sunlight.

I’ve tried this recipe twice and both times it turned out too dry – In order for me to reach the consistency in the video I added more milk (I didn’t measure, but I think I added almost a cup!). Are you sure the measurements are right?
Even though the first time was a bit stiffer, they came out quite good – just missing those nooks and crannies. Hopefully my 2nd go at it will work out better after having added more liquid.
Thanks!
I made the English muffins using your recipe except I didn’t have heavy cream so I used 3/4 cup whole milk instead. They turned out amazing. I was buying my English muffins from Dollar Tree which I really like for the price and product. They have since quit carrying them and I wanted English muffins but didn’t want to pay the prices of the other stores. Thank you for this recipe. I would love to show you a picture of my muffins, but I don’t know how to attach it to this comment.